Pushed myself to experiment today, and I'm loving the process and the results! I've done paper marbling using shaving cream in the past, and I love the results. My thinking was inspired by previous experiments with:
- Gelli plate and acrylic paint mono-printing
- Ebru-- the art of creating colorful patterns by sprinkling and brushing color pigments on a pan of gelatin water, and
- Color Burst-- concentrated micro-fine watercolor powders--by Ken Oliver


First, inspired by Ebru, I experimented with painting food dye onto a plate of shaving cream. I used about 1/4 to 1/2 inch layer of cream which I leveled out with a ruler (spatula, cardboard, etc. would work too.) I squeezed a few drops of yellow dye onto the plate and then using a small pointer (back of my paintbrush) I pulled the color through the cream in a sunburst pattern. I added a drop of red in the center of the flower, giving it a little swirl then literally painted the green stem and leaves onto the shaving cream with a small-tipped paintbrush. Wha la! My favorite is the top right which was created last after the shaving cream had been squished a bit making the other cards.


Next I used my spatula to stir up the cream and even out the color (Picture shown is from my third plate of cream.)
I added dye drops and zig zagged my way top to bottom then left to right and then again. Ebru art has lots of marbing techniques to explore, not to say that this card represents them. Loving the results! Decided to wash the cream away and start with a fresh glob.

While I was rinsing one of my tools ,which I tend to rinse often and place on towel to be readily used again, I noticed I dripped water on the plate of cream. OMG! the water reacted with the cream removing the color! I contemplated...is this water resist, color resist or something else? I grabbed some pre-cut cards to press.

The result was fun! (Although these results are from another batch as you can see from the specks of color.)
Then I got intentional with my splattering using my DIY splatter brush made from an old paintbrush.


Stir it up...and now for Color Burst!

 I had no idea what would happen. I assumed any water or liquid elements of the cream would react with the pigment powder.
Dipping immediately only created a speckled look which were actually raised speckles.

Since Color Burst is frequently spritzed with water to create effects, I decided to spritz the plate of cream and wondered how the water would effect the Color Burst especially since the water pushed the color away earlier in earlier plates of cream. The green dotted card is the actual result. Push Plus Pull equals...

What would happen if I sprinkled color burst and added drops of food dye to make my starbursts/flowers. I made a fresh plate, easily rinsing the last down the drain.

 With much anticipation, I gently pressed my card, making sure every edge was covered, into the yummy concoction.

I love these!
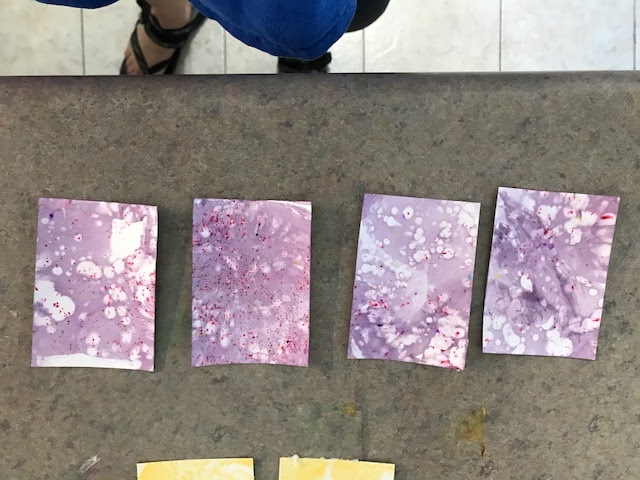
You'll notice the cards in middle have bolder color as they were the first pressed into the color. I like the ones around the edges more as the colors and shapes are softer. Easily made enough cards from one batch.

Some cards needed more color so I pressed just that part of the card into the color I wanted more of.

My experiments were coming to a close but not without a quick stir of the cream and a little more play with the medicine bottle dipped in water and even a lil water splattering.


These are more cards I made somewhere along the process.
Tinted background from a previous batch, sprinkled with Color Burst, and food dye flowers/swirls.
Sometimes the 4th, 5th,...10th cards are my favorites.
 Digging these beauties!
Yellow tinted cream with Color Burst sprinkled and then swirled with pointer. The possibilities are endless!
Clean up was easy. My kitchen smells delightful. Countertops are super clean from the shaving cream. Cards even smell nice. More later, maybe, on which inks work best stamping on these card surfaces.
My first official day of experimentation is a success, in my opinion, and I intend to plan a day of experimentation at least once a week and share my results. :)
Super fun results! I never thought to try dylusions, I'm very inspired to play now :)
ReplyDeleteI love it. You should post it to him on facebook. He might get a kick out of this.
ReplyDelete