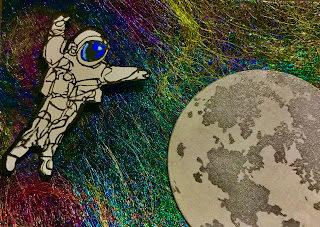
 For the New Product/ Underused/Product 2020 tracker by Linden Leaf, I selected Fusible Webbing to work with for the four sets of LTCs that I would make through the year. For this second set, I'm using double sided fusible webbing and a product new to me-- Angelina Heat Bondable Fibers.
 In addition, I used:
*non-stick teflon heat resistant sheet
*iron
*double-sided fusible webbing
*cardstock
 Angelina Fibers are available in an array of colors.There are many online sites that offer the fibers. I have yet to find it at popular craft stores though. I bought my supply through an Etsy dealer.
 I wasn't sure yet what subject I wanted to use with this background, but I needed to work with the fibers to see what might be possible. I enjoy creating skies and space so I looked at NASA photos and then selected fiber colors to blend to create a starry sky or galaxy-like background.
 I cut a workable size square (usually double or triple an LTC card size) of the fusible webbing (FW) and applied it to the base cardstock (black.) This will allow the fibers to adhere to the cardstock. The Angelina Fibers will bond to themselves but not to other fibers.
 Next, I fluffed the fibers and pressed them to the FW, keeping in mind where the cardstock would be cut to create each LTC.
I folded the teflon craft sheet over the prepped fibers and cardstock.
 ...and applied heat. Directions say about 20 sec. per area. More heat can be applied later where needed.
 *ALLOW THE HEATED SURFACES AND FIBERS TO COOL BEFORE PEELING THE TEFLON BACK.
 Once cooled, the teflon releases and now the fibers are fused flat together. More fibers can be added and more heat.

Trim the excess from the edges and cut to size.
The next challenge: what subject matter to work with to create the LTC?
I enjoy re-using stamps so I searched my collection with hopes of finding a subject. I decided to use a layered stamp of the moon that I carved for a Santa tracker to try out some ideas. Once I placed the cutout of the stamped moon on the background, I knew what I had to add to complete the idea. An astronaut spacewalking.
And I did NOT want to fussy cut a bunch of lil astronauts, so I put my Cricut to work by uploading the image to Cricut Design space and prepping it as a cut image. I would stamp my carved image directly to the cutouts created by the Cricut! Genius I thought. After painstakingly revising the cutout sizes, I decided that fussy cutting didn't seem so bad, but I persevered.
Once each lil cutout was stamped, I colored the reflective helmet shield with Copic markers, buffed all the edges of cardstock (crucial finishing touches) and adhered the astronaut to the card with foam adhesive squares. Titles for me are inspirational and what better title for this card than
String Theory.
I still have much to learn about the possibilities of Angelina Fibers so I look forward to exploring these sights:


